
Research shows that Active learning (one of our 4 Principles of Teaching and Learning) can help students gain a richer, deeper understanding of their subject matter as well as develop better relationships and networks with their peers during their education.
Engageli is a platform built from the ground up to help educators create engaging active and collaborative learning experiences for their students. This resource is a list of active learning ideas contributed by a variety of education specialists at the Coventry University Group.
You’ll find ideas for facilitating more active learning experiences for your students, grouped broadly by the following types:
- Icebreakers
- Discussion
- Collaboration
- Inquiry
- Wrap-Ups
You’ll notice some overlap in the activities as they’re presented here. This is because engaging learning experiences often combine a variety of teaching styles.
Icebreakers
These activities are designed to be short, informal and welcoming. Not only do they give students some breathing room to make sure their equipment is set up and working properly, they’re a great way to get everyone ready to engage with the rest of the lesson.
Icebreakers can be directly related to the subject at hand, but this isn’t always essential.
Icebreakers from the Engageli Team
Duration: 5 to 15 minutes
Our partners at Engageli have developed a short list of highly engaging icebreakers/warm-up activities that work well for any subject – especially towards the start of a module. What’s more, they’ve even created a PowerPoint file you can download, adapt to suit your needs, and run with your students right away.
You can view and download the PowerPoint here:
Coventry Engageli Icebreaker Template
Related Guides: Creating a poll | Engagement Thermometers
Create an Opening Poll
Duration: 2-5 minutes
Polls are a great way to gauge students’ interest and understanding with a given topic. A great way to kick off a lecture or seminar is to create a one or more questions about what you’re about to cover in class with a poll. (Polls can be great conversation starters too). Sharing the poll results with the class can help to put people at ease and help them to visualise the diversity of opinion all around them.
The Engageli knowledge base has an article on how to create a poll – all you need to go is to grab the right QR codes from the website and embed them into your PowerPoint before class. Then, during your session, when the slide comes up, just click “Launch Poll”.
You might even consider launching a similar poll at the end of the session to see how opinion or understanding changes over the course of your lesson.
Related Guides: Creating a poll
Check the Temperature
Duration: 5 minutes
The Emoji Thermometer provides a quick way to check the temperature of your class. You can use emojis to quickly check student confidence on topics such as threshold concepts or assessment literacies.
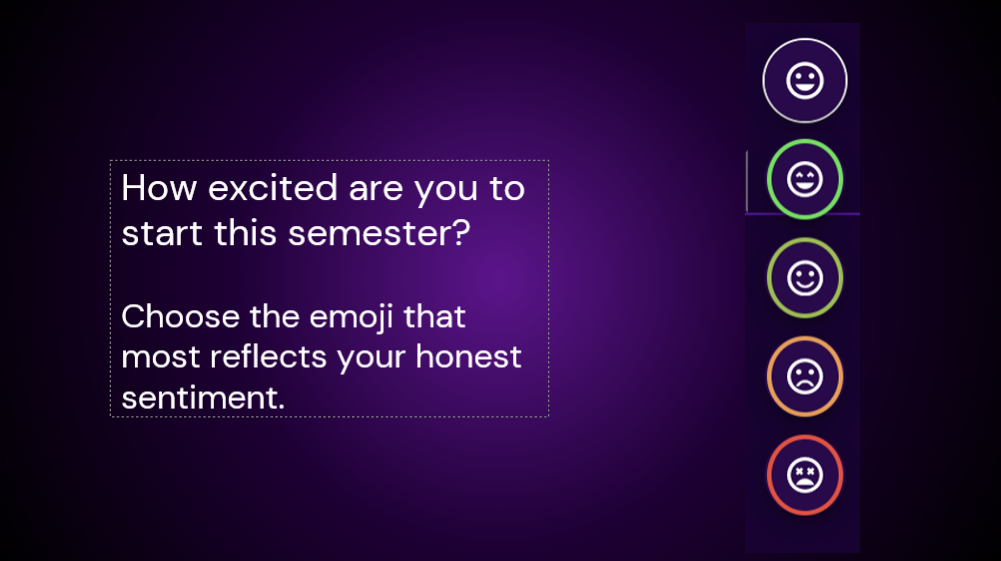
- Ask a question related to this week’s topic e.g. How confident do you feel about this week’s assignment? How are you feeling today?
- Ask students to choose one of the four emoji options in the Emoji Thermometer as their response. Participants have four emoji options to choose from and their answers are anonymous.
- As participants answer, the thermometer will move up and down
- Emoji responses are always anonymous, but if you want to be able to follow up with specific students, you may want to run this exercise using the thumbs up/down reaction instead.
- You can follow the results up with a Q&A or a teachable moment depending on your feedback.
Related Guides: Engagement Thermometers | Send a Reaction to a student
Discussion

Having many learners at the same time means having a wealth of ideas, opinions, worldviews, and approaches to understanding new information all in the same (online) place. By facilitating discussions, you’re encouraging students to solidify what they’ve learned, identify the boundaries of their understanding, and enrich each other in the process of speaking about ideas.
Sharing Experiences – Solving Problems
Duration: 15 minutes
Sharing real life experiences of a topic can be a powerful way to bring learning to life and gives students the chance to adapt theoretical knowledge to real world situations. By sharing experiences or subject specific problems amongst peers learners are able to take part in collaborative analysis and problem-solving activities.
- Select participants with experiences or problems that are relevant to the topic that they are willing to discuss or share.
- Assign each participant to a table in Engageli, and either allow students to choose their own table on arrival or preset tables.
- After explaining the activity, ask participants to present to their table the experience or problem to be explored. The table discusses what has been presented with reference to a primer sheet shared with each table.
- The table should co-prepare a brief summary of the discussion, and a table member can then present the summary to the wider class.
Related Guides: Table assignment | Table Communication | Distributing Documents | Podium
Group Reflection
Duration: 10-15 minutes
A group reflection typically takes place following another significant activity or exercise during the same session.
By reflecting as a group, diverse voices can be heard leading to a broader reflection on and activities outcomes with shared analysis and discussion of future learning.
- Present each table with a set of questions developed to successfully reflect holistically on an activity. For example,
- What took place?
- What were the results of the activity.
- What were the causes of the final outcome.
- What should come next?
- When the table discussions have finished, open up the class to a plenary discussion using notes on a shared screen to record the answers to the questions and any further reflections.
Related Guides: Distributing documents | Table Communication | Discussion mode
Virtual Fish Bowl
Duration: 30 minutes
Hearing experts engaging in conversation can allow learners to observe not only views and knowledge but also the analytical and critical processes that are important to their chosen field of study. By inviting students to join the panel and take an active part of the discussion they are given the opportunity to not only ask questions but to also have their views and observations brought into the conversation building confidence in their own ideas and allowing incorrect concepts to be assessed and corrected in a low stakes environment.
- Invite a group of SMEs (subject-matter experts) to sit in a ‘panel’ to discuss a topic.
- After an initial discussion by the panel, each table is asked to supply either a question or point to add to the discussion.
- Call on a representative student from any table to sit with the panel to become part of the discussion, bringing the question or point their table created in the previous step.
- When the discussion moves on, a representative from a different table swaps with the student from the previous step.
Related Guides: Hosting a Panel | Table Communication | Discussion mode
Roman Forum
Duration: 30 minutes to 1 hour
This idea is loosely based on the idea of a Roman forum with two orators or speakers who represent the case – for or against a particular issue. You can use a Roman Forum to debate political problems, legal and legislation issues and key issues for your discipline. You can also use this approach for problem-solving and case studies.
- Introduce the topic or issue to be debated and let students know you’ll be asking them to sit in tables based on their opinion of the issue. If they’re not yet decided, instruct them to pick a table based on which side is underrepresented, as it’s helpful to have the sides as even as possible in terms of numbers.
- Each table has a maximum of 10 students, so you may need to divide them into sets of tables – either For and Against. You can say, for example, tables 1-5 are “For” and 6-10 are “Against”. (You can even click to edit the names of each table in the Table view to reflect this).
- Nominate a person from the class to represent the For position and another to represent the Against.
- Each table discusses the issue from their particular standpoint and then forwards their conclusions to their speaker/representative.
- Each speaker then collates ideas from all their tables and then presents the case, either For or Against, to the whole class in a panel-style discussion.
- When both speakers have debated, the floor is open to questions. (Whole class discussion, students can also submit their ideas via the Q&A feature).
- At the end of the session, everyone votes For or Against by using a thumbs up or down emoji or via a poll.
Hosting a Panel | Table Communication | Discussion mode
Collaboration
Like discussion, collaboration is about helping students to identify and extend the boundaries of their understanding. The key difference, however, is that where discussion emphasizes exploration, collaboration demands a clear output in which each student is a stakeholder.
In order to collaborate, students must understand the concepts well enough to contribute meaningfully and convincingly to the final output.
Art Attack
Duration: 30 minutes
Rather than discussion or writing, drawing can be a fun way to share thinking and collaborate on ideas.
Students need to be given prior guidance on how to set up a collaborative drawing environment (Microsoft Whiteboard, Miro, Mural, Jamboard etc)
- Give each table a topic or topics to draft with clear guidance on expectations for the collaborative drawing they’ll need to create.
- Each table drafts their drawing using the online tool.
- Ask students to share their drafts with the wider class using the podium, and invite feedback from the class using the chat or discussion mode
- Time permitting, invite the tables to regroup and collaboratively reassess their drafts based on the feedback they have obtained.
Related guides: Table Communication | Screen Sharing | Podium | Discussion Mode
Elevator Pitch
Duration: 15 minutes to 1 hour
The elevator pitch involves condensing down a concept in order to present it clearly and quickly to someone who may not be familiar with the subject. In education, elevator pitches can help learners to develop their ideas to the point of formulating an informative presentation within the time constraints of a group seminar.
By having the development process occur in class, you have the advantage of being able to observing this process and give support and advice rather than just seeing the finished pitch.
- Give each table a topic and a limited amount of time to develop ‘pitches’ that are to be shared with the rest of the class.
- Encourage the tables need to self-organise into roles such as presenter, researcher, developer etc.
- Tables then work on the task for 10-15 minutes.
- Ask a presenter from each table to deliver the 5-minute elevator pitch.
Related Guides: Distributing documents | Table Communication | Screen Sharing | Podium
Jigsaw Learning
Duration: 15 minutes – 1 hour
Jigsaw learning is a cooperative learning technique which aims to minimise conflicts and improve student motivation and engagement in the classroom.
It essentially involves dividing up the key concepts you want to teach by asking each table to work on just one aspect of the material for the session. It might look like this:
- Split a key concept or topic into key areas, and create an editable document with Google Docs or MS Word for each question or area of the concept to explore.
- Distribute the documents to the tables so that they can being to research or investigate the question.
- Each group should research their topic and create something collaboratively to demonstrate their findings. This may be a poster, mind map, presentation or bullet points on the document you shared with them.
- Call on a representative from each table to present what they were asked to research and what they found to the rest of the class – either by raising their hand or by hosting a panel in Engageli
- You can optionally give a quiz on the material at the end of the session to see how well the students were able to teach each other.
Related guides: Table Communication | Screen Sharing | Podium | Discussion Mode | Hosting a Panel
Inquiry

Inquiry is about asking questions and finding answers.
While it can be done individually or as a group, the test of effective inquiry is whether learners are able to focus their questions and their research methods precisely enough to discover meaningful answers.
Ask the Expert
Duration: 30 minutes
A guest lecture from external experts or student alumni is a popular activity, giving students the opportunity to hear expert opinion and real world application of their learning.
This exercise gives students the opportunity to take advantage of collaborative activities to effectively interrogate an expert guest. This allows for the development of more pertinent and insightful questions whilst also allowing those with perhaps less confidence to take part in the questioning process.
- Rather than an external expert lecturing, ask students to work in groups to develop questions for the expert which they then answer as a ‘chat show’ type exercise.
- Give each table time to prepare a question that they can then send to you or the session host or post in the Q&A
- The expert is then asked each question, and the table is then invited to ask a follow-up question.
- You can then open up to the rest of the class for follow-ups before presenting the expert with the next question.
Related Guides: Distributing documents | Table Communication Podium | Discussion mode | Moderating the Q&A
Treasure Hunt
A Treasure Hunt or WebQuest is an inquiry form of inquiry learning where students use online resources to research their answers. They can also be used to increase familiarity with the course materials and syllabus at the start of the semester.
This can be done using the Distribute Documents feature or with the student’s Notes feature by following these steps:
- Create a list of questions about this week’s topic and share your screen with the class.
- Ask students to take a screenshot of the questions using the screenshot tool in their Notes tab.
- Students search the web for the answer to the question, adding it as an annotation to the screenshot as they go.
- To share their findings, students can download and share their notes, share their screen with the class or their table, or simply discuss their answers with the table or class.
Related Guides: Annotate Presentation | Student Notes
Wrap-Ups
Like icebreakers, wrapping up activities (or wrap-ups) are short, informal ways to get students engaged. The difference is that a good wrapping up activity should invite students to look back on the lesson as a whole in order to capture insights for both their benefit as well as yours.
Minute Paper
Duration: 5-10 minutes
Minute papers are reflective documents your students can create in about a minute. They can be used to foster reflection and formative feedback before the end of your session.
You can start a minute paper using short answer polls, the chat, or on shared documents distributed to each table for discussion. They can be used in a variety of formats including polls, table discussions or reflective notes. For example:
- Invite your students spend between 1-3 minutes at the end of the session writing down the most significant thing they learned from the session. It might be something that they found to be particularly surprising, meaningful or useful.
- As an individual activity, invite students to post their reflections in the class chat or as short answer responses to a poll you’ve created. Or, as a group activity, ask them to write their reflections on a shared document.
- You can review these questions after the class, but it’s most effective to leave extra time at the end to share and possibly respond to some reflections before you close the session.
Related Guides: Distributing documents | Table Communication | Creating a poll
Muddiest Point
Duration: 5-10 minutes
Muddiest point paper – an adaptation of the minute paper where students analyse and record anything that they are still unclear about and any questions they still have. This activity can be delivered in a variety of formats including polls, table discussions or reflective notes.
Because you’ll be asking students to reflect on what they’ve learned and share what still isn’t clear to them, this type of wrap-up works best as an individual rather than group activity.
- Set a 1-minute timer for students to think about anything significant, surprising or useful they learned during the session, posting their responses in the general class chat.
- Now set another 1-minute timer for students to think about anything which wasn’t clear to them or they would like further clarification on in the Q&A. Remind them that they can post questions anonymously if they’re worried about coming across as silly or falling behind everyone else.
- Take a few minutes to read through the reactions in the chat and try to quickly clarify questions posted in the Q&A before the end of the session.
Related Guides: Moderating the Q&A | Set a Timer
Conclusion
Hopefully these active learning ideas have given you a good place to start when designing your own engaging online teaching sessions. If you have your own that haven’t made this list, feel free to leave us some written feedback at the bottom of this article.
If you found these helpful, but aren’t quite sure how they would fit into a lesson plan, have a look at our ready-to-use Complete Active Learning Lesson Template for Engageli.
Please view this Aula Help Centre article on how to integrate and share Engageli classrooms within the Aula platform.
Lastly, if you feel your students can use more help with the Engageli platform in order to take part in some of these activities, check out our Engageli resources to share with your students.
If you have not done so already, please make sure you have reviewed the Engageli step-by-step guidance article.