Introduction
Breakout rooms are a great way to facilitate groupwork, but they can be disruptive to set up and may leave students feeling isolated from the instructor and the rest of the class. Here are seven tips about how to make your breakout room activities work better for you and your students.
Please note that the tips focus on Microsoft Teams. However, the principles behind them are applicable to similar applications like Zoom.
1 Establish the ground rules
It might be obvious to you that breakout rooms are a great way to facilitate collaborative learning, but it can be helpful if you make expected behaviour clear to students. The first few times that you use breakout rooms with a cohort, explain that this is a student-led part of the class and everyone should participate. There are valid reasons why students might not want to have their cameras on (poor connections, overstimulation, lack of a private workspace), but sometimes they may feel more comfortable turning on video in breakout rooms rather than large groups. Outline the benefits of having video on and encourage them to do so if possible.
2 Set up tasks carefully
‘So what are supposed to be doing?’
Clarity of instructions is one of the biggest factors in the success of an activity, and this is especially important before moving students into breakout rooms. Once they’ve left the main room, it’s more difficult for them to check with you if there’s something they don’t understand.
It sounds obvious, but clear instructions should tell students what they have to do, how long they have, and what materials or tools they should use. Keep your explanations concise, break complex activities up into stages, and use visual support (see the next tip).
Try watching back a video of your last class and focus on the instructions, or write down your instructions for a few activities in your next class. Do they follow all the principles mentioned above?
3 Provide written and visual support
Even if your oral instructions are clear, it’s a good idea to give students a written version as well, for example on a PowerPoint. This will help them to stay on task and can support accessibility and inclusion of international students.
However, if you typically use a PowerPoint to deliver your sessions, you’ll be aware that students aren’t able to see your slides once they move to a breakout room. To get around this, there are a few different options:
- Before you open the breakout rooms, ask students to take a screenshot of the instructions slide (Shift + Windows key + S / Shift + Cmd + 4 on a Mac) and paste it into a Word doc. Alternatively, they could just take a photo of the screen with their phones.
- Have activity instructions in a separate PDF that you ask students to download and refer to during the lesson.
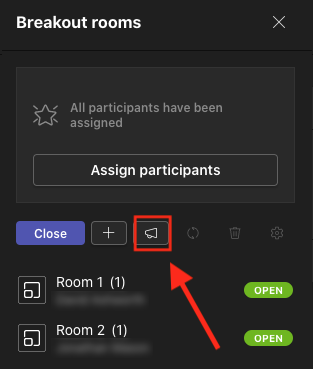
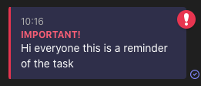
- Wait until the breakout rooms are open, then use the announcement function (in the ‘Rooms’ tab, click the loudspeaker icon) to send a reminder of the instructions to all the rooms. Your message will appear with a red exclamation mark and the word IMPORTANT! in capitals in the breakout room chat.
4 Don’t be a stranger
As mentioned above, a common complaint about breakout rooms is that they isolate students from their instructor. Address this directly by letting students know how they should contact you. For example, you could ask them to nominate one person in their group to send you a direct message on Teams, or simply @mention you in the breakout room chat.
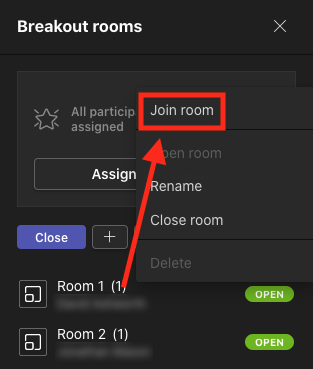
Once the breakout rooms are open, it’s important to monitor how students are getting on so you can provide support as and when needed. In the ‘Rooms’ tab, click the ellipsis button on the breakout room you want to enter and then ‘Join room’ from the pop-up menu. When you want to move on, simply click the red ‘Leave’ button at the top right and you’ll return to the main room.
One problem that instructors often face is that it’s difficult to monitor in an unintrusive way in breakout rooms. The best approach is to explain what you’ll be doing. Let students know that you will be popping into each of the breakout rooms to check how everything is going, but you don’t want this to disrupt them. Unless they have a question, they can ignore you and continue with the task.
5 Capture the learning
Students are more likely to understand the rationale for using breakout rooms if the work they do in them is captured and referenced in the main room. For example, you could use the Shelf Padlet template to create a space for each table to post a summary of their discussion, and then go through these with the whole class during the post-activity feedback stage. For further information about Padlet templates, see the Padlet layout options article.
6 Give a countdown
It can be frustrating for students if they are wrenched out of a discussion or task before they’ve had chance to wrap up. To avoid this, get your best The Great British Bake-Off hat on and use the announcements feature to give students a 10-minute / 5-minute / 1-minute warning so they know how long they have left.
7 Welcome students back to the main room
If students are focused on a task (or just looking out the window), they might not realise that they have left their breakout room and returned to the main room. This can cause embarrassment, as they sometimes continue talking without realising that everyone can now hear them. To avoid this, loudly welcome everyone back into the room as soon as the breakout rooms close. Don’t worry about speaking over people – it seems rude, but they’ll be glad of the nudge to stop any private conversations!
Conclusion
Breakout rooms can be a fantastic way to facilitate social and collaborative learning. I hope these tips help your students to feel more comfortable so they can get the most out of their next breakout room.